🚀 Elevate Your 3D Printing Game!
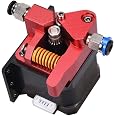
The BIQU N-O Bigtreetech Dual Gear Extruder is a high-performance upgrade designed for various 3D printers, featuring a robust all-metal construction and a dual gear system that ensures smooth filament feeding. Compatible with popular models like CR-10 and Ender 3, this extruder is easy to install and backed by a 24-month warranty, making it a reliable choice for both hobbyists and professionals.


| Part number | WGC000291 |
| Item Weight | 73 g |
| Package Dimensions | 10.3 x 9.5 x 2.7 cm; 73 g |
| Item model number | WGC000291 |
| Color | Red |
| Batteries Required? | No |
M**N
A great upgrade for my biqu b1 but needs some config changes and spacer
I have 4 BIQU B1s and installed these on 2 of them so far. I plan to do the other 2. These are a really solid upgrade. For the BIQU B1, you need to be aware of a couple things:- The esteps will need to be changed. Mine defaulted to 98 on the old factory extruder. (That resulted in 105mm instead of 100mm extruded by the way). The correct estep value for these is 136 for a BIQU B1. You can set this via gcode using "M92 E136" then issue a save with "M500". You can also use the "save to eeprom" in the BIQU B1 menu to save. If you're not comfortable entering console commands you can use the tuning menu in the BIQU B1 and do the calibration then ignore the measurements and just increase the esteps to 136. After that, make sure you use the "save to eeprom" option.- Some slicers add esteps to the gcode. The ideamaker app that comes with the BIQU B1 does this. So you'll have to edit the printer config and go to advanced and change it from 98 to 136. You can open the gcode files with notepad or such and search for M92 and make sure it's E136 not E98 in that file.- You can alternatively do none of the above and only change the value in the gcode from M92 E98 to M92 E136 but this requires editing each gcode file after saving it.- Finally, the printer's filament sensor will be slightly too low when installing the new extruder. Ideally you need a couple more 1/4" spacers and a couple longer M3 screws. What I did is unscrew the two screws on the filament sensor and move it to the left so that the right screw went into the left hole on the holding bracket. Then I just used the right screw to hold the sensor in place. This moved it to the left almost an inch and the filament can bend a little and it works with no other spacers. A better long term solution will be to get some longer M3 screws and print a couple extra spacers. But it's been working as I set it without any additional parts.
O**2
Works great for ender series printers
I used it on my ender 3v2 it worked great and installation was easy. One thing to note is I had to reset the steps per millimeter on the extruder.
A**T
Good product
All around good product. The only issue is, can it could be my version of Ender 3, is the motor shaft (no jokes) is not long enough for gear to sit all the way down so had to mount it halfway up the draft to make it line up with second gear.
D**.
Absolutely kills it.
To get it out of the way first, yes, as everyone else has mentioned... No instructions. However, if you pay attention when you are removing your old extruder, this is a straightforward process.I have been trying in vain to get a large nozzle (1.0 mm) to work on my ender 3 pro for rapid drafting. The stock extruder laughed in my face and skipped like a record when I tried to print with the 1 mm. I installed this extruder, not really expecting that much of a difference, but I had tried every other suggestion for fixing extruder skipping. Slowed the print down, adjusted up my zed offset, changed stepper motors, checked stepper voltage, all that crap.Long story short, I installed this guy and have run a few tests. I started with a layer height of .6 at a print speed of 30. No problemo. I was surprised. So I jumped it up to the .8, same speed. No issues. I went bananas and jumped it up as far as I could possibly need it to go: 1 mm layer height at 50 mm/s (my usual speed for PETG).I'll note here that I ran it at a 1.1 layer width as well.Holy crap, it ran it no problem. You can watch your spool as the life drains out of it at that height and speed, but it does an amazing job now. Just from the extruder change. Buy it. Buy it now.BTW, you can do a layer height the same as the nozzle, but you need to know how to set your slicer. Most people recommend no more than 75 - 80 percent, and that's perfect if you don't want to muck around too much.
P**R
Poor quality. Doesn't work.
I bought two of these. The first one kind of worked kind of fine. The second one didn't work at all.The sleeve on the lever arm is designed to protrude from the body a small amount so that when the screw is tightened, the lever arm will still move. The first one was that way and the lever arm moved freely. On the second one the indented hole that the sleeve sets down in to was not as deep by .5mm as the first one which made the sleeve not protrude from the body. When the screw was tightened, the lever arm would not move.The second problem (with both) is that just below the feed rollers where the filament enters the hole to continue on down the path is poorly designed. The hole is so small that the filament hangs up on the edge of the hole. This makes it impossible to change colors mid print and difficult to even start a print. I think I fixed the problem by using a counter sink to open up the top of the hole and funnel the filament path. Time will tell.Anyway, I returned the second extruder that didn't work at all.
Trustpilot
3 weeks ago
2 weeks ago